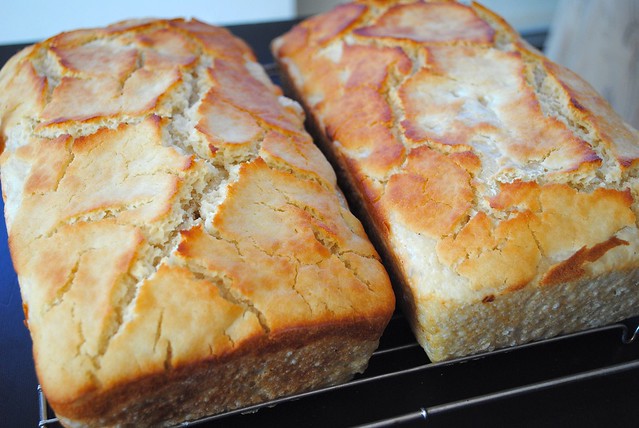
My first post as a Daring Baker! And it couldn't have been a better challenge. This month we got to pick any bread recipe and top it with this awesome Dutch crunch topping. I love bread (or any carb, really). I love baking fresh bread and using it to make a huge sandwich. Anything I can really sink my teeth into.
I chose to top Kneedlessly Simple's English Muffin Bread with the crunch topping, mostly because I'd been itching to try out the bread recipe for a while. This was also my first time using the no knead method. I was a bit suspicious of it at first, but it turned out great! And the Dutch topping... Well, I love anything with a lot of texture, and it was definitely crunchy. Such a great idea to top a bread with. It gives that crunchy tooth action just before you sink into the pillowy bread.
I used the Dutch crunch topped English muffin bread (what a mouthful!) to make a frittata avocado sandwich. When I was considering what kind of sandwich to make, I started to think about English muffins, which are usually used (here in North America) in McMuffins or breakfast sandwiches. So I decided to do something with eggs. Then I remembered that I'd been wanting to make a frittata sandwich for a while and the rest is history!
Now, this is a kneadless dough, so make sure to start it at least a day before you want to eat it! It's hard enough to wait to stuff your face full of it without forgetting that it takes a day to prepare!

Kneadlessly Simple's English Muffin Bread
Taken from Keadlessly Simple by Nancy Baggett
Makes 2 medium loaves
Ingredients:
- 5 cups (25 ounces) unbleached all purpose white flour, plus more as needed
- 1 tablespoon granulated sugar
- 2 teaspoons table salt
- 1 teaspoon instant, fast-rising, or bread machine yeast
- 2 1⁄2 tablespoons corn oil
- 2 2⁄3 cups ice water, plus more if needed
- 1⁄3 cup top-quality instant nonfat powdered milk
Directions:
First rise: In a large bowl, mix together the flour, sugar, salt and yeast. In a second bowl, whisk the oil and ice water together. Add the ice/oil mixture to the dry ingredients and thoroughly mix until completely blended. If too dry, add more ice water but don't over moisten! Dough will be pretty stiff. Add more flour if it becomes too wet. Brush the top of the dough with oil and tightly cover the bowl with plastic wrap.
Put in the fridge for 3 hours. After, let rise at a cool room temperature for 12-18 hours, stirring vigorously halfway through.
Second rise: Vigorously stir the powdered milk into the dough. Add more flour, if needed, to make the dough very stiff. Grease two 8x4" loaf pans very well. Cut the dough in half with a sharp serrated knife and place one half in each loaf pan. Brush the tops with oil and tightly cover with plastic wrap.
Let rise either at room temperature for 1 1/2 to 2 1/2 hours; or refrigerate for 4-24 hours, then set out at room temperature. Let rise until the dough nears the plastic, then remove the plastic and rise until the dough reaches the rim of the pans.
Let rise either at room temperature for 1 1/2 to 2 1/2 hours; or refrigerate for 4-24 hours, then set out at room temperature. Let rise until the dough nears the plastic, then remove the plastic and rise until the dough reaches the rim of the pans.
Baking: 15 minutes before baking time, preheat the oven to 400F and place a small oven-safe pan filled with an inch of water on the floor of the oven. Make the Dutch crunch topping (recipe follows) and top both loaves.
Reduce the oven temperature to 375F. Bake for 30-40 minutes, or until the top is cracked and a nice golden brown. Cover with foil and bake for another 10-20 minutes, or until the loaf sounds hollow when you tap it. Remove from oven and cool in the pans for 10-15 minutes. Remove the loaves from the pan and cool completely.
Reduce the oven temperature to 375F. Bake for 30-40 minutes, or until the top is cracked and a nice golden brown. Cover with foil and bake for another 10-20 minutes, or until the loaf sounds hollow when you tap it. Remove from oven and cool in the pans for 10-15 minutes. Remove the loaves from the pan and cool completely.
Can be kept at room temperature for 3 days, fridge for a week, or frozen for up to 2 months. Use it in a sandwich, like my Spinach Frittata Avocado Sandwich below!
Dutch Crunch Topping
From Daring Bakers, March 2012
Ingredients:
- 2 tbsp (2 packets, 30ml) active dry yeast
- 1 cup warm water
- 2 tbsp sugar
- 2 tbsp vegetable oil
- 1/2 tsp salt
- 1 1/2 cups rice flour (white or brown. Not glutinous rice flour)
Combine all ingredients in a large bowl. Beat with a whisk hard to combine. Consistency should be like a stiff icing: spreadable, but not runny. It should drip off slowly from your whisk. Let stand for 15 minutes.
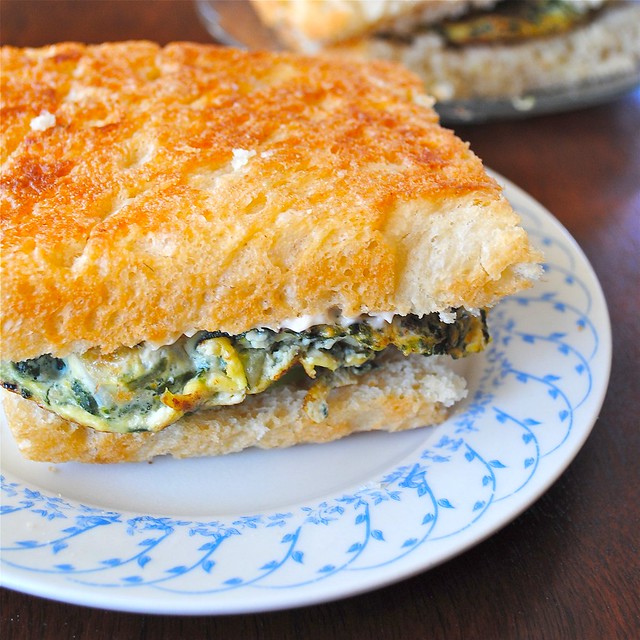
Spinach Avocado Sandwich
Makes 2 sandwiches
Ingredients:
- 3 cups of spinach (about a small bunch), stems removed and rinsed
- 2 tbsp olive oil
- 1/2 of a red onion, chopped
- 4 eggs, lightly beaten
- 1/4 c Parmesan cheese, grated
- 1 tsp salt and pepper each (and to taste)
- 4 slices of English Muffin Bread
- 1/2 an avocado, sliced
- 1 tbsp mayonaise
- 1 tsp mustard
Heat 1 tbsp of olive oil in a large sauté pan. Add spinach and cook until wilted, about 2-3 minutes. Remove from pan and finely chop.
Combine the rest of the ingredients with the chopped spinach and mix well to combine. Heat the rest of the olive oil in a sauté pan. When hot, add your egg mixture and cook until the bottom is nice and golden, about 5 minutes. Hold a plate flat over the pan, invert the frittata onto the plate, then slide it back into the pan to cook on the other side until golden and set, about 3-5 minutes. Cut in half.
Assemble: For the first sandwich, spread half mayonaise and mustard on two slices of bread. Take one slice and arrange half of the avocado on top of it. Top the avocado with half of the frittata, season with salt and pepper, then top with another slice of bread. Repeat for the second sandwich. Enjoy~